
Tenant Wallets
Tenant wallets are created by the EFT Corporation team for each tenant. They serve as the funding source for disbursements, top-ups, and wallet transfers initiated by the tenant.
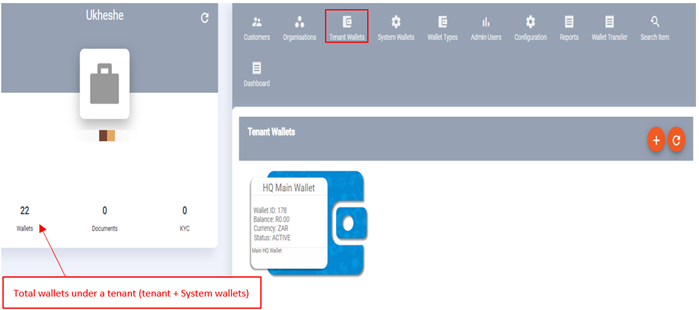
Viewing Tenant Wallets
Navigate to Wallets > Tenant Wallets to view all tenant wallets. For each wallet you can see the wallet ID, balance, currency, and status.
Common Uses of Tenant Wallets
| Use Case | Description |
|---|---|
| Disbursements | Fund the tenant wallet, then transfer to individual customer wallets via Wallet Transfer |
| Float management | Maintain a float balance that backs customer wallet balances |
| Settlement receipts | Receive settlement funds from acquiring operations |
| Fee collection | Where retail fees are credited before distribution |
Funding a Tenant Wallet
Tenant wallets are funded via:
- EFT/Bank transfer — with real-time deposit notifications, incoming EFTs to the tenant's pool account are automatically credited to the configured tenant wallet. See Pool Account Integration.
- Manual allocation — users with appropriate permissions can manually allocate funds through the Admin Portal.
NoteThe structure and number of tenant wallets depends on your tenant's product configuration. Contact [email protected] for assistance with tenant wallet setup.
Tenant Wallet Tabs
Clicking on a tenant wallet opens its profile with the following tabs:
| Tab | Description |
|---|---|
| General | Wallet name, balance, status, currency, wallet type, friendly wallet ID |
| Transaction History | Full transaction ledger with date filtering (max 30-day range). To search transactions across every wallet in the tenant instead of one wallet at a time, use Wallet Transaction Search |
| Top-Ups | Top-up history; initiate top-ups from another wallet or third party |
| Withdrawals | Outbound withdrawal history |
| Remittance | Cross-border remittance transactions |
| QR Codes | Linked QR codes for payment acceptance |
| Transfers | Initiate wallet-to-wallet transfers |
| Reservations | Pending/reserved funds awaiting settlement |
| Scheduled Withdrawals | Recurring withdrawal jobs scoped to this wallet |
| Audit Events | Every transaction and state change on the wallet |
| Attachments | Supporting files attached to the wallet record |
Changing Wallet Status
- Open the tenant wallet and click the General tab.
- Select the new status from the status dropdown.
- Click Save.
Valid statuses: ACTIVE, BARRED, CANCELLED, LOCKED, PENDING.
Changing a tenant wallet to
BARREDorLOCKEDblocks all debit and credit operations on that wallet. UseLOCKEDfor temporary holds; useBARREDonly for fraud or compliance reasons.
Initiating a Transfer from a Tenant Wallet
- Open the tenant wallet and click the Transfers tab.
- Click + Transfer.
- Enter the destination wallet ID, amount, currency, and description.
- Click Confirm. If maker-checker is enabled for your role, the transfer creates a pending task for approval.
For bulk transfers (disbursements to many wallets at once), use the Wallet Transfer bulk upload feature.
Updated 3 months ago