
Customers
This section covers customer management, KYC verification, and wallet management from within the Eclipse Admin Portal.
Customer Management
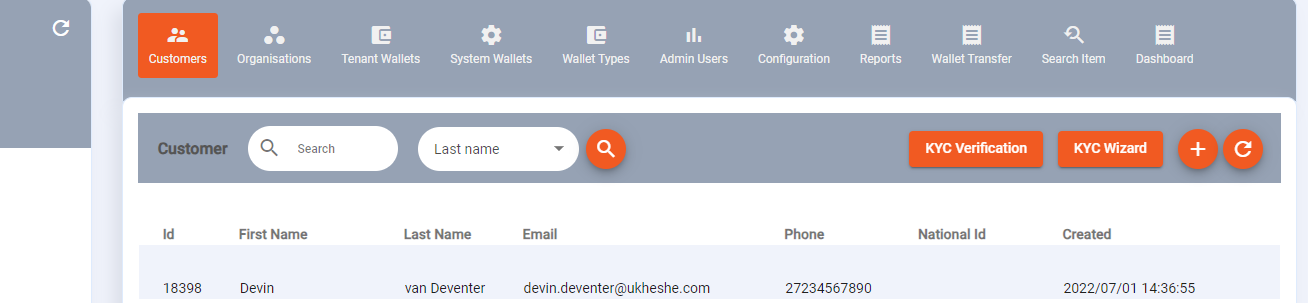
Searching for a Customer
The Customers tab lists all customers registered on your tenant.

Customers
To search for a customer:
- Click Customers in the left navigation.
- Use the search input box at the top of the customer list. You can search by:
- First or last name
- Phone number
- Email address
- Customer ID
- The list filters in real time as you type.
- Click on a customer record to open their profile.
Viewing a Customer Profile
Clicking a customer record opens the General customer view. The profile is divided into tabs:
| Tab | Contents |
|---|---|
| General | Name, status, contact details, date created |
| Addresses | One or more physical or postal addresses |
| Documents | KYC documents: ID/passport/driver's licence, selfie images |
| Identity | Unique identifier (typically the customer's mobile number with a prefix) |
| KYC | KYC verification results and status |
| Manual KYC | Interface to perform or override a KYC result manually |
| KYC Verification | Secondary review workflow for pending KYC applications |
| Positions | The customer's position(s) within an organization |
| Wallets | All wallets linked to this customer |
| Cards | All cards linked to this customer across all wallets |
Creating a Customer Manually
If a customer is onboarded outside of the self-service app, you can create their profile directly in the portal.
Plus Icon
To create a customer:
- In the Customers tab, click the + (plus) icon.
- Complete the customer information form. Fields marked with a red X are mandatory.
- Ensure the email address is correct — the customer will receive system notifications at this address.
- Click Save to create the profile.
NoteDo not create a password for customer accounts. Customer authentication credentials are managed separately through the onboarding flow.
Updating Customer Details
- Open the customer profile by clicking their record in the Customers list.
- Select the General tab (or Addresses for address changes).
- Edit the relevant fields directly in the form.
- Click Save to record your changes. Changes are not saved until the Save button is clicked.
KYC & Identity Verification
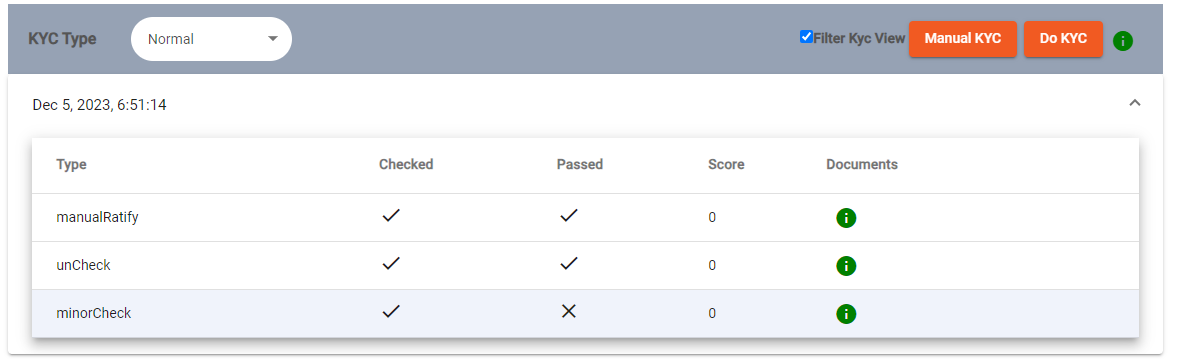
Viewing KYC Status
- Open a customer profile and click the KYC tab.
- This page shows which KYC checks have been performed and whether each has passed.
- A combination of liveness checks and compliance checks is performed before a customer can hold an active wallet.

Viewing and Uploading Documents
- Open the customer profile and click the Documents tab.
- All KYC documents attached to the customer are listed here (ID, passport, driver's licence, selfie images).
- Documents can be updated and manually uploaded if needed.

Performing a Manual KYC Override
Manual KYC is intended for edge cases where the automated OCR process failed on clearly legible documents, or where documents are present but not machine-readable.
WarningOnly perform a manual KYC if you have personally verified that the information and documents provided by the customer are accurate and legitimate.

- Open the customer profile and click the Manual KYC tab.
- Review the customer's identity documents and personal information on-screen.
- Complete the manual verification form.
- Click Save to apply the override.
KYC Verification Workflow
The KYC Verification feature provides a structured secondary-review workflow. It is not enabled by default — contact the Ukheshe team to enable it for your tenant.
Upon initial login, the landing page defaults to the Customers tab. To commence the process, the admin user simply needs to access the KYC Verification button to begin their verification journey.
After redirection, the admin user lands on the global verifications screen, equipped with a status filter allowing sorting by Pending, Accepted, or Rejected applications. A search-by-date filter shows users created within a specified timeframe. If the ratify result ID is available, it can be used directly for search.
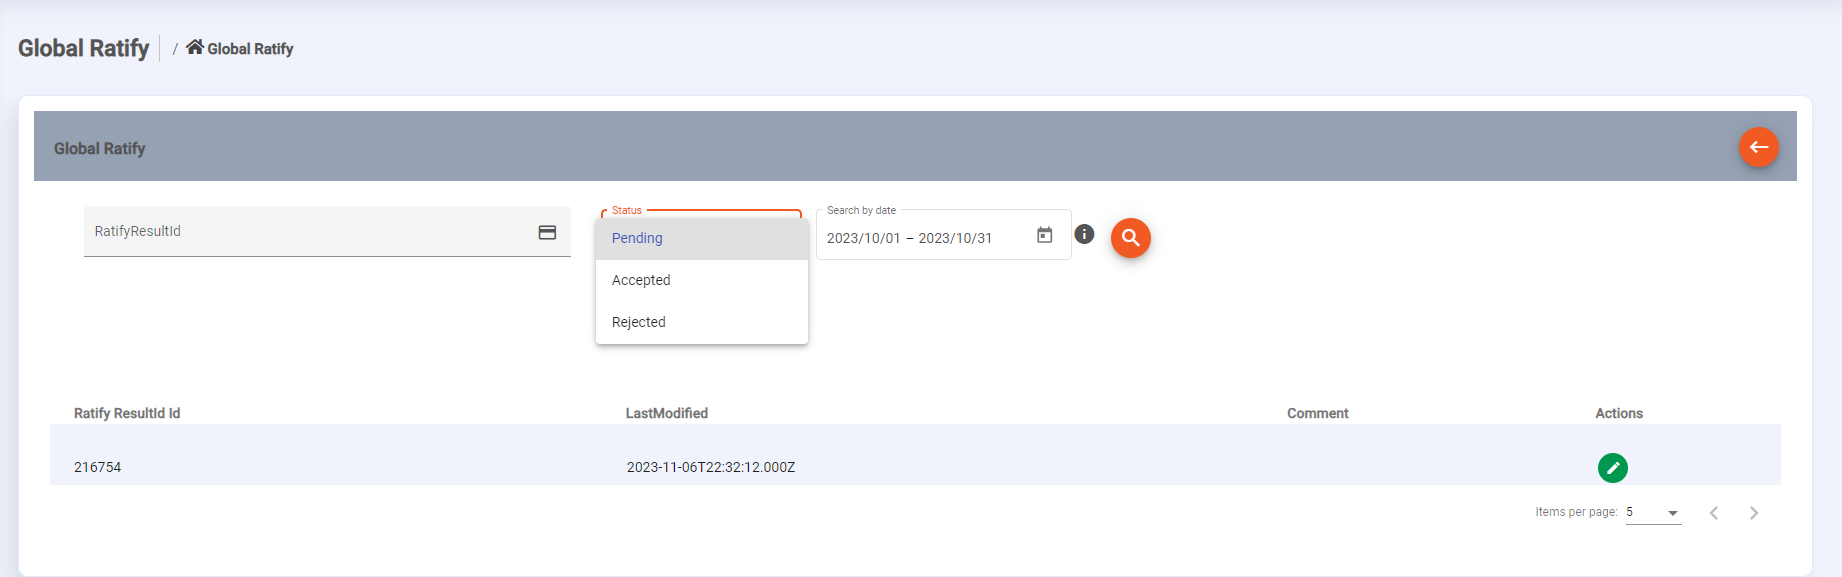
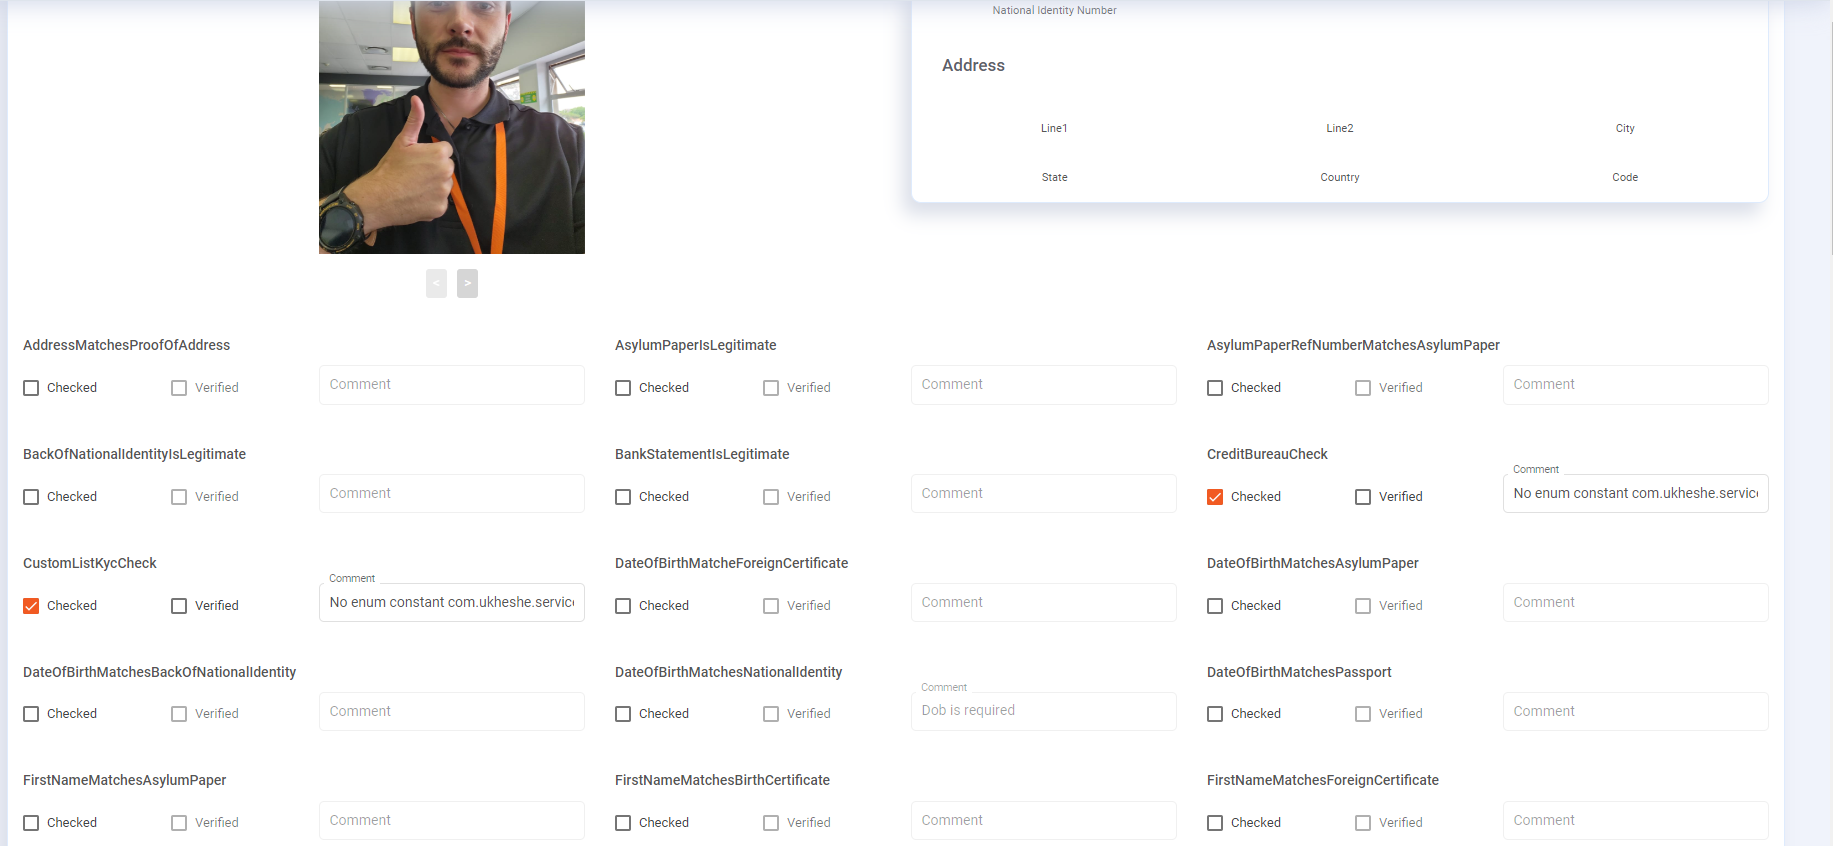
To review and action an application:
- Click the action icon in the Actions column.

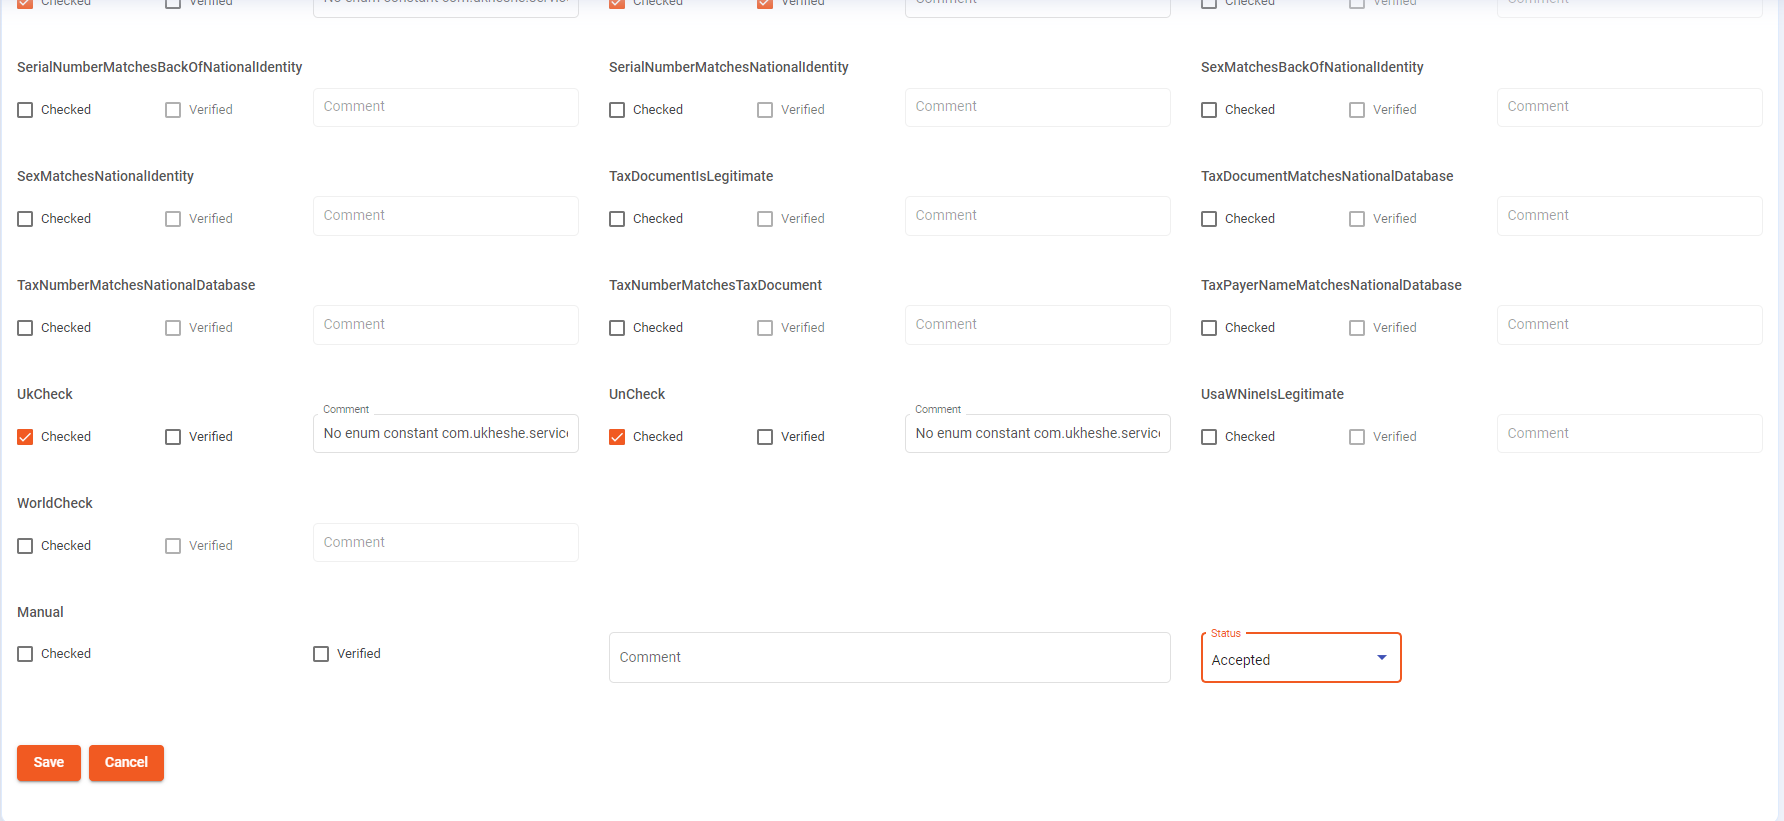
- On the details page, review each KYC check. Tick the Verified checkbox for each check you have confirmed. Add comments to individual text fields as needed.
- Scroll to the bottom of the page to set the application status:
- Approved: All checks are verified and documents are legitimate. Click Save to create a new KYC result marked as Completed.
- Rejected: The application does not meet requirements. Click Save to create a rejection result.
- Pending: Leave the application in its current status without taking action.
Impact of KYC Rejection on Wallets
- Rejection: When an application is rejected, any wallets the customer already holds will be BARRED — they cannot transact.
- Re-approval: If a previously rejected application is later set to Accepted, BARRED wallets will be UNBARRED automatically. This applies whether the wallet was barred by the KYC rejection workflow or manually barred by another admin user.
NoteTo use the KYC Verification feature, the following permissions must be configured for the admin user role at both global and tenant levels:
Address.READ.AllowedAttachment.READ.AllowedBarWallet.WalletType{digitalwallet}.UPDATE.AllowedBarWallet.WalletType{virtualwallet}.UPDATE.AllowedCard.READ.AllowedCard.UPDATE.AllowedCustomer.READ.AllowedDocument.READ.AllowedOrganisation.READ.AllowedRatify.CREATE.AllowedRatify.READ.AllowedUnbarWallet.WalletType{digitalwallet}.UPDATE.AllowedUnbarWallet.WalletType{virtualwallet}.UPDATE.AllowedTenantConfig.READ.AllowedWallet.WalletType{virtualwallet}.READ.AllowedWallet.WalletType{digitalwallet}.READ.AllowedWallet.WalletType{digitalwallet}.UPDATE.AllowedWallet.WalletType{lockedwallet}.READ.Allowed
Wallet Management
A wallet is only created or exists when a customer has passed KYC. Wallets can be pure digital wallets or card-linked wallets.
Click on Wallets to view a customer's wallets. Each wallet has its own Wallet ID and Friendly Wallet ID / Unique Reference.

Wallet Status Values
| Status | Meaning |
|---|---|
| ACTIVE | The wallet is fully operational and available for transactions |
| BARRED | The wallet cannot be used; typically applied due to fraud investigation or KYC rejection |
| CANCELLED | The wallet is permanently closed |
| LOCKED | The wallet is blocked from use but can be customer-controlled or admin-applied |
| PENDING | The wallet cannot be used due to outstanding verifications |
NoteIn the event of fraud or suspected fraud, change the wallet status to LOCKED to prevent further transactions while the investigation is under way.
Wallet General View
Once a wallet is clicked, more information is provided: wallet name, balance, wallet type, wallet status, wallet currency, and more.

To change wallet status:
- Open the wallet General tab.
- Select the new status from the status field.
- Click Save.
Transaction History
All transactions linked to the associated wallet. Transactions can be date-filtered (maximum 30-day range). Click on a transaction to see more details.

Top-Ups
All successful top-ups done on a wallet. Authorized users can also initiate top-ups to the wallet from a Tenant wallet or Third party.

To top up a wallet from the portal:
- Open the wallet and click the Top-Ups tab.
- Click the top-up action button.
- Select the funding source (Tenant Wallet or Third Party).
- Enter the amount and reference.
- Click Confirm.
Withdrawals
Withdrawal history for a wallet including withdrawal status. Pending Paycorp withdrawals can be deleted under Reservations if needed.

Remittance
A remittance transaction can be searched using the remittance ID, or filtered by date range.

QR Codes
Shows the QR code and image linked to the associated wallet. Clicking the + icon allows creation or linking of an existing QR code. Note: some wallet types do not support QR codes.

Reservations
All reservations on the wallet. If the current balance and available balance do not correspond, check here — unsettled amounts will reflect. Pending Paycorp withdrawal reservations can be deleted from this page.

Transfers (from Wallet)
Specific admin users can transfer funds from a tenant wallet to another tenant wallet, customer wallet, or organization wallet directly from within the wallet view.

Audit Events
A list of all audit events for the wallet, giving full details of every transaction and state change on the wallet and wallet history.

Cards (Wallet View)
All cards linked to the associated wallet ID. You can view card details (pack ID, date created, expiry date), edit properties (change card status), reset PIN, send PIN to customer, and view card status.

Positions
View or create a customer's position under an organization.

Wallet Configurations
The Configurations tab on a wallet allows administrators to set wallet-level overrides for limits, fee profiles, and other wallet-specific settings that differ from the wallet type defaults.
- Open the wallet and click the Configurations tab.
- Available configuration fields depend on the wallet type.
- Update the required fields and click Save.
Scheduled Withdrawals (Wallet-Level)
Each wallet has a Scheduled Withdrawals tab that shows all scheduled withdrawal jobs scoped to that wallet.
- Open the wallet and click the Scheduled Withdrawals tab.
- View the list of active and past scheduled jobs.
- Click + Schedule Job to create a new scheduled withdrawal.
- See Scheduled Jobs for full details on job configuration.
Wallet Attachments
Each wallet supports file attachments (e.g., supporting documents, settlement agreements, proof of funding).
- Open the wallet and click the Attachments tab.
- Click + Upload to attach a file.
- Supported file types: PDF, DOC, JSON, TXT.
- Enter a name and attachment type, then click Save.
Customer-Level Features
Device Fingerprints
The Devices tab on a customer profile shows all registered device fingerprints. Device fingerprints are used for fraud detection and device-bound authentication.
- Open the customer profile and click the Devices tab.
- Each entry shows the device fingerprint ID, device name, and registration date.
- To remove a device (e.g., for fraud or device replacement), click the Delete icon and confirm.
Removing a device fingerprint forces the customer to re-register their device on next login.
Identity
The Identity tab shows the unique identifier linked to the customer — typically their registered mobile number in a normalised format (e.g., 27821234567).
- Open the customer profile and click the Identity tab.
- The identity record shows the identifier type and value.
- Identities can be added or removed to link/unlink phone numbers from the customer account.
Attachments (Customer Level)
The Attachments tab on a customer profile stores files associated with the customer that are not part of the KYC document set (e.g., contracts, letters of instruction).
- Open the customer profile and click the Attachments tab.
- Click + Upload to attach a file. Supported types: PDF, DOC, JSON, TXT.
- Existing attachments can be viewed or deleted.
Customer Audit Events
The Audit Events tab at the customer level shows every administrative action taken on the customer record — status changes, field updates, KYC decisions, and more.
- Open the customer profile and click the Audit Events tab.
- Use date filters to narrow the view.
- Click any event row for full details including the before/after state of changed fields.
Loans
The Loan tab on a customer profile shows all loan accounts linked to the customer.
| Column | Description |
|---|---|
| Loan ID | Unique loan identifier |
| Start Date | Loan origination date |
| Name | Loan product name |
| Term | Loan term in months |
| Interest | Interest rate |
| Status | Current loan status |
| Provider | Loan management system (LMS) provider |
| Amount | Principal amount |
| Outstanding | Remaining balance |
Click the View action on a loan to see transaction history, repayment schedule, and status history.
Loan functionality requires integration with a supported LMS provider. Contact your EFT Corporation account manager to enable loan products.
Customer Payments
The Payments tab allows authorized administrators to initiate a payment on behalf of a customer — for example, paying a merchant or service provider directly from the customer's wallet.
- Open the customer profile and click the Payments tab.
- Click + New Payment.
- Fill in the destination wallet, amount, currency, and reference.
- Click Confirm to submit.
All payments initiated from the portal are recorded in the wallet's transaction history with the initiating admin user's ID in the audit trail.
Customer Beneficiaries
The Beneficiaries tab lists all registered payment destinations (bank accounts, mobile money numbers) for the customer.
- Open the customer profile and click the Beneficiaries tab.
- Click + Add Beneficiary to add a new payment destination.
- Existing beneficiaries can be viewed and deleted; bank details are immutable after creation.
Beneficiaries are used when initiating withdrawals to external bank accounts. See Beneficiary Use Cases for the full API flow.