
Card Present Use Cases
Eclipse supports a wide range of terminal card-present payment options. This includes traditional terminal driving and processing as well as softPOS - the ability to run an application on a mobile phone and tranform it into a POS terminal.
Terminal Acquiring
Three main use cases are currently supported:
- Card Present Payment Processing
In this scenario, the tenant manages its own POS terminals and uses Eclipse purely for card-present payment processingto an acquiring bank.
- Terminal Driving with Nexo-Supported Devices
Here, terminal management is handled on the EFT platform. Merchants use API calls for Eclipse to trigger card payments to be initiated on POS terminals. Eclipse supports the Nexo interface, where terminals register with Eclipse on power-up and can be triggered to initiate a payment. Payments are processed from the terminal through termApp.ISO to the EFT Postilion platform and sent to the acquiring bank.
This can be useful for unattended terminals where payments are initiated from another device or for any scenario where you would want to initiate a payment from a particular terminal using API calls. Example use cases:
- Initiating payments through unattended POS terminals for scenarios like EV charging or parking payments
- Initiating a payment through a website or teller that then initiates payment completion through a POS terminal
- Terminal Driving with Terminals Running the EFT Application
This scenario is identical to the Nexo-based terminal driving scenario - the only difference is that the POS application and Eclipse are EFT-controlled. This means that the communication protocol to drive the terminal can be broader and support custom features not necessarily supported in the Nexo standard.
NoteDepending on the terminals and acquiring bank, L3 device certification may be required.
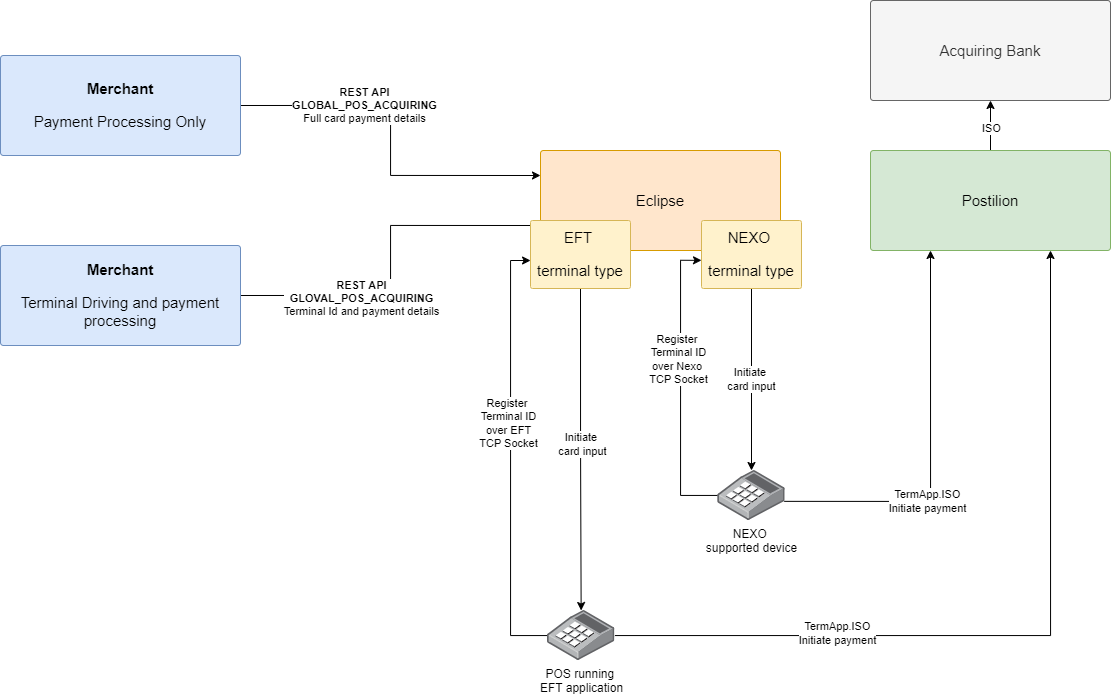
Eclipse card present scenarios
Card Present Payment Processing
Supported Transaction Types
| Transaction Type | ISO Code |
|---|---|
| Purchase | 00 |
| Cashback | 09 |
| Pre-Authorization | 01 |
| Pre-Auth Extension | 03 |
| Pre-Auth Completion | 02 |
| Refund | 20 |
| Balance Enquiry | 31 |
| Reversal | 40 |
Prerequisites
- Valid JWT
- Eclipse organisation created with merchant ID set
- If in South Africa acquiring bank mapping set with tenant config
acquiring.s2pdms.acquireroracquiring.s2pdms.acquirer.{merchantId}if a single tenant connects to multiple different acquiring banks - If outside South Africa relevant
postbridge.configtenant configs for connecting to an acquiring bank via Postilion
To initiate a card-present payment, use the GLOBAL_POS_ACQUIRING payment type. Full EMV card details are included in the paymentCardData field.
Examples
Default example payment:
{
    "amount": 2000,
    "currency": "ZAR",
    "destinationWalletId": 2550907,
    "externalUniqueId": "b4692bd6-1987-4a7e-929f-7f78fbaeb4dcd",
    "paymentMechanism": "CARD",
    "type": "GLOBAL_POS_ACQUIRING",
    "replyPolicy": "WHEN_COMPLETE",
    "reference": "000000000003072",
    "paymentCardData": {
      "accountType": "00",
      "applicationIdentifier": "A000000004101002",
      "cardSequenceNumber": "03",
      "encryptedCardholderName": "08AACEA9E67054CFBD1110DF82639ED3F84219A84D5725A98172FF104D544950302A2A2A2A2A2A2A20313341",
      "encryptedExpiry": "084BEB7AD226EE23FE0903C35F3C47331A65090325AAAA",
      "encryptedPan": "08075229F0350B310F09081EC6502094F8CB7C08541333AAAAAA0045",
      "encryptedTrack2Data": "085D8BA1842A1A61BC1911D97975D00BD07A388FC57D17A2E480C7572EA2F60F58F57511541333AAAAAA0045DAAAA201019460027F"
    },
    "paymentSecurityData": {
      "applicationInterchangeProfile": "5800",
      "applicationTransactionCounter": "004E",
      "cryptogram": "E32B04B2A79B3862",
      "cryptogramInformationData": "82",
      "issuerApplicationData": "0210A000002C0400000000000000000000FF",
      "pinData": "E6C96162ED8CBA1D",
      "pinDataType": "00",
      "unpredictableNumber": "0D01BA5F"
    },
    "paymentTerminalData": {
      "cardholderVerificationMethodResults": "420300",
      "deviceMake": "SPECTRA_APOLLO",
      "pointOfServiceEntryMode": "051",
      "terminalCapabilities": "E0F8C8",
      "terminalCountryCode": "710",
      "terminalIdentifierType": "externalTerminalId",
      "terminalIdentifier": "10000049",
      "terminalType": "22",
      "terminalVerificationResult": "4240248000",
      "transactionType": "00",
      "TerminalApplicationVersionNumber": "0002",
      "mti": "0200"
    }
  }
Example response:
{
  "paymentId": 54726,
  "externalUniqueId": "rhfabcdfggthygfgfgh",
  "status": "PENDING",
  "amount": 6000,
  "description": "EFT Corp Test 2021 : Transaction Details",
  "merchantName": "EFT Corp Test 2021",
  "currency": "ZAR",
  "partialPaymentAllowed": false,
  "additionalFields": [],
  "acceptedCardSchemes": ["MASTER", "VISA", "MAESTRO", "AMEX"],
  "completionUrl": "https://eclipse-java-sandbox.ukheshe.rocks/t/wXYR37",
  "paymentType": "CARD",
  "created": "2023-06-27T09:03:05.000Z",
  "lastModified": "2023-06-27T09:03:07.992Z",
  "paymentData": "6481005932",
  "paymentInstrumentInfo": {
    "cardPhone": "27723891234"
  },
  "fee": 0,
  "customerId": 1901324,
  "gatewayTransactionId": "MP-PR-44134774"
}
NoteThe payment endpoint supports both synchronous and asynchronous modes. See Synchronous vs Asynchronous Payment Calls
Single tap and pin example for contactless 2-step authorisation flows. In this scenario contactless card transactions can initially be submitted without a pin, and if a pin is requested it can be submitted in a subsequent request.
POST /eclipse-conductor/rest/v1/tenants/{tenantId}/organisations/{orgId}/payments
{
    "amount": 100,
    "currency": "ZAR",
    "destinationWalletId": 2550907,
    "externalUniqueId": "ad3e12b7-054e-4894-97bb-4ba16a3f6b87",
    "paymentMechanism": "CARD",
    "type": "GLOBAL_POS_ACQUIRING",
    "replyPolicy": "WHEN_COMPLETE",
    "reference": "000000000003709",
    "paymentCardData": {
        "accountType": "00",
        "applicationIdentifier": "A0000000041010",
        "cardSequenceNumber": "01",
        "encryptedExpiry": "084D481491481476660903D53ACD562A73B4470349AAAA",
        "encryptedPan": "08C73F6324FF72C81809085522519911B3C53208541333AAAAAA0554",
        "encryptedTrack2Data": "0803A82BEF035DEA701911DF48C50F7C4874B8DF6C0291DC88CF4321D2194A341B19D511541333AAAAAA0554DAAAA2010123456789"
    },
    "paymentSecurityData": {
        "applicationInterchangeProfile": "1980",
        "applicationTransactionCounter": "0002",
        "cryptogram": "################",
        "cryptogramInformationData": "80",
        "issuerApplicationData": "0110A0000F040000000000000000000000FF",
        "unpredictableNumber": "FAD386E0"
    },
    "paymentTerminalData": {
        "cardholderVerificationMethodResults": "1F0302",
        "deviceMake": "SPECTRA_APOLLO",
        "pointOfServiceEntryMode": "071",
        "terminalCapabilities": "E00808",
        "terminalCountryCode": "ZA",
        "terminalIdentifierType": "externalTerminalId",
        "terminalIdentifier": "10000049",
        "terminalType": "22",
        "terminalVerificationResult": "0000008001",
        "transactionType": "00",
        "TerminalApplicationVersionNumber": "0002",
        "mti": "0200"
    }
}
Example response:
{
    "paymentId": 4292253,
    "externalUniqueId": "5bf443a9-12f1-40ff-bb9d-3645e65ab9ed",
    "status": "BUILDING",
    "amount": 100.000000000,
    "merchantName": "Nomad Nedbank Acquiring",
    "merchantId": "000000001732510",
    "currency": "ZAR",
    "additionalFields": [
        {
            "id": "extendedResponseCode",
            "value": "1600"
        },
        {
            "id": "schemeOrigTransactionId",
            "value": "MCC0002PF0511  "
        },
        {
            "id": "schemeType",
            "value": "MasterCard"
        }
    ],
    "acceptedCardSchemes": [],
    "cardPhone": "1234567890",
    "phone": "1234567890",
    "acceptedPaymentMechanisms": [],
    "paymentType": "CARD",
    "bankResponse": "65",
    "retrievalReferenceNumber": 2212160,
    "created": "2026-05-11T05:57:19.000Z",
    "paymentInstrumentInfo": {
        "cardBin": "541333",
        "cardType": "00",
        "cardLast4": "0554",
        "cardPhone": "1234567890"
    },
    "fee": 0,
    "paymentReference": "000000000003709",
    "walletId": 2550907,
    "organisationId": 11246596,
    "paymentTerminalData": {
        "terminalId": "10000049"
    },
    "tracingContext": "00-f4881235f6c2014add9b47cbbb7c43a0-bd852f0bb5194960-03"
}
Subsequent request with pin data included:
PUT /eclipse-conductor/rest/v1/tenants/{tenantId}/payments/{paymentId}
{
    "amount": 100,
    "paymentCardData": {
        "accountType": "00",
        "applicationIdentifier": "A0000000041010",
        "cardSequenceNumber": "01",
        "encryptedExpiry": "084D481491481476660903D53ACD562A73B4470349AAAA",
        "encryptedPan": "08C73F6324FF72C81809085522519911B3C53208541333AAAAAA0554",
        "encryptedTrack2Data": "0803A82BEF035DEA701911DF48C50F7C4874B8DF6C0291DC88CF4321D2194A341B19D511541333AAAAAA0554DAAAA2010123456789"
    },
    "paymentSecurityData": {
        "applicationInterchangeProfile": "1980",
        "applicationTransactionCounter": "0002",
        "cryptogram": "################",
        "cryptogramInformationData": "80",
        "issuerApplicationData": "0110A0000F040000000000000000000000FF",
        "pinData": "53C9AE2C7F398B4C",
        "pinDataType": "00",
        "unpredictableNumber": "FAD386E0"
    },
    "paymentTerminalData": {
        "cardholderVerificationMethodResults": "1F0302",
        "deviceMake": "SPECTRA_APOLLO",
        "pointOfServiceEntryMode": "071",
        "terminalCapabilities": "E00808",
        "terminalCountryCode": "ZA",
        "terminalIdentifierType": "externalTerminalId",
        "terminalIdentifier": "10000049",
        "terminalType": "22",
        "terminalVerificationResult": "0000008001",
        "transactionType": "00",
        "TerminalApplicationVersionNumber": "0002",
        "mti": "0200"
    },
    "type": "GLOBAL_POS_ACQUIRING"
}
Example response:
{
    "paymentId": 4292253,
    "externalUniqueId": "5bf443a9-12f1-40ff-bb9d-3645e65ab9ed",
    "status": "SUCCESSFUL",
    "amount": 100,
    "merchantName": "Nomad Nedbank Acquiring",
    "merchantId": "000000001732510",
    "currency": "ZAR",
    "additionalFields": [
        {
            "id": "sessionKeyCryptogram",
            "value": "0008871TB00S0000E40C50DEBBCEC126369FA5B196396874D21F4D48D516E99FD083248672939C156BEF9B64"
        },
        {
            "id": "sessionKeyCheckValue",
            "value": "4B5501"
        },
        {
            "id": "schemeOrigTransactionId",
            "value": "MCC0002PG0511  "
        },
        {
            "id": "schemeType",
            "value": "MASTERCARD"
        }
    ],
    "acceptedCardSchemes": [],
    "cardPhone": "1234567890",
    "phone": "1234567890",
    "acceptedPaymentMechanisms": [],
    "paymentType": "WALLET",
    "authCode": "920237",
    "bankResponse": "00",
    "retrievalReferenceNumber": 2212160,
    "created": "2026-05-11T05:57:19.000Z",
    "lastModified": "2026-05-11T05:57:53.337Z",
    "paymentInstrumentInfo": {
        "cardBin": "541333",
        "cardType": "00",
        "cardLast4": "0554",
        "cardPhone": "1234567890"
    },
    "fee": 0E-9,
    "paymentReference": "000000000003709",
    "walletId": 2550907,
    "organisationId": 11246596,
    "paymentTerminalData": {
        "terminalId": "10000049"
    },
    "tracingContext": "00-97d16f10176ec0904b78a4bb2c880fe1-a21eee6f561dddd3-03"
}
Terminal Driving and Card Present Payment Processing
When using Eclipse to drive a terminal for card-present payments, the terminal must be configured to register with Eclipse on power-up.
The same GLOBAL_POS_ACQUIRING payment type is used, but no paymentCardData is included—card details are captured directly by the device.
Supported Transaction Types
| Transaction Type | ISO Code |
|---|---|
| Purchase | 00 |
| Cashback | 09 |
| Pre-Authorization | 01 |
| Pre-Auth Extension | 03 |
| Pre-Auth Completion | 02 |
| Refund | 20 |
| Balance Enquiry | 31 |
| Reversal | 40 |
Prerequisites
- Valid JWT
- If in South Africa acquiring bank mapping set with tenant config
acquiring.s2pdms.acquireroracquiring.s2pdms.acquirer.{merchantId}if a single tenant connects to multiple different acquiring banks - If outside South Africa relevant
postbridge.configtenant configs for connecting to an acquiring bank via Postilion - Terminals added to the EFT payment platform
- Terminals configured to register with Eclipse on startup
- If using Nexo devices tenant config
NexoAllowedMerchantIdMatchmust be set as a regex of the merchant IDs of the terminals that are allowed to register for this tenant.
To initiate a terminal driving card-present payment, use the GLOBAL_POS_ACQUIRING payment type - the paymentCardData field is not populated which triggers Eclipse to initiate a payment on the terminal to capture the card details and process the payment.
POST /eclipse-conductor/rest/v1/tenants/{tenantId}/payments
{
  "additionalFields": [
    {
      "id": "DISPLAY_JSON",
      "value": "[{\"Label\":\"Vehicle Reg\",\"Value\":\"JD10PGGP\"},{\"Label\":\"Duration\",\"Value\":\"165 Minutes\"}]"
    }
  ],
  "paymentTerminalData": {
    "terminalId": "00010003",
    "transactionType": "00",
    "terminalType": "NEXO"
  },
  "type": "GLOBAL_POS_ACQUIRING",
  "amount": 10,
  "callbackUrl": "https://webhook.site/65990d0e-b4ab-4acb-97e5-b1c3f3df64c6",
  "currency": "ZAR",
  "externalUniqueId": "30446529-2834-4acc-aa67-348ffaedce0f",
  "paymentMechanism": "CARD",
  "destinationWalletId": 2551890
}
Example payment object, once payment has been completed on the terminal:
{
    "paymentId": 4096259,
    "externalUniqueId": "fe3921d9-96ce-41cb-9624-84102834f7b3",
    "status": "SUCCESSFUL",
    "amount": 10.000000000,
    "merchantName": "parket",
    "merchantId": "4599239",
    "currency": "ZAR",
    "additionalFields": [
        {
            "id": "DISPLAY_JSON",
            "value": "[{\"Label\":\"Vehicle Reg\",\"Value\":\"JD10PGGP\"},{\"Label\":\"Duration\",\"Value\":\"165 Minutes\"}]"
        }
    ],
    "acceptedCardSchemes": [],
    "acceptedPaymentMechanisms": [],
    "paymentType": "CARD",
    "authCode": "D51113",
    "bankResponse": "00",
    "retrievalReferenceNumber": 2129920,
    "created": "2026-01-29T10:41:44.000Z",
    "lastModified": "2026-01-29T10:42:01.000Z",
    "paymentInstrumentInfo": {
        "cardBin": "461266",
        "cardLast4": "0808"
    },
    "fee": 0E-9,
    "walletId": 2551890,
    "customerId": 28284,
    "paymentTerminalData": {
        "terminalId": "00010003"
    },
    "tracingContext": "00-ff7cf60287af3a8a3ff12f91c8822de8-b2ab6b7a134d0259-01"
}
Note:How Eclipse initiates the payment depends on the terminal type:
- Terminals of type NEXO use the Nexo interface.
- Terminals of type EFT use the EFT interface.
If the device supports it, additional information can be sent to the terminal for display under
additionalFieldswith IDDISPLAY_JSON
Session Key Management
Eclipse supports the retrieval of session PIN keys for terminals. This requires a Terminal Master Key (TMK) exchange ceremony between the merchant and the EFT platform.
When a merchant calls the session key API for a specific terminal ID:
- Eclipse generates a random HSM key, encrypted under the merchant’s TMK.
- The encrypted key is stored under the terminal on Eclipse.
- When a payment is received for that terminal, Eclipse uses this key to translate the PIN block before sending it to the acquiring bank.
Prerequisites
- Valid JWT
- Terminal created on Eclipse
- TMK exchange ceremony between EFT and merchant
Use the sessionKeys API to request a session key for a terminal:
POST /eclipse-conductor/rest/v1/tenants/{tenantId}/session-keys
{
  "mode": "RANDOM_TERMINAL_KEY_UNDER_TMK",
  "terminalIdentifier": 1234,
  "terminalIdentifierType": "externalTerminalId"
}
Example response:
{
  "terminalId": "12345",
  "encryptedSessionKey": "wegtersgtghbdf"
}
MPOS/Tap On Phone
Visa Cloud Acceptance (VAC), also know as Kernel in the Cloud (KiC), enables contactless payments on any Android device or phone (Android OS 12 and newer) provided they are NFC-enabled without any additional hardware. VAC is EMV L2 certified.
This is available as an SDK for App integration described below. Alternatively EFT Corporation provides the option of using a companion app to manage the Tap On Phone payment process. This requires simpler integration than integrating to the VAC SDK and also means that future verifications and lab testing will not be needed for Tap On Phone on the tenant app as this will be covered by the companion app. For more details please refer to the Tap on Phone Integration Guide.
Benefits of VAC
- Simplified L2 certification requirements resulting in faster time to market
- Low integration cost
- Transforms any connected device into a POS, enabling new payment flows and experiences
- Enabler for integrated value-added services
Device Requirements
- Android OS version should be 12 or higher
- Google Play service-supported device
- Should have the NFC capabilities
- Should have Hardware keystore (ELIGIBILITY_HARDWARE_KEYSTORE_PRESENT)
End-to-end VAC Process
The steps below demonstrate the actions from pre-transaction initiation to the updates needed upon success or failure response. The VAC SDK documentation should be requested for the Visa Developer Portal.
VAC Prerequisites
- Create a JWT
- Create an Organisation
- Create a new Wallet for the Organisation
- If you are using the VAC SDK directly in a new application and not using the EFT Corporation companion app - your application must be registered with Visa on sandbox and production including app package name, acquiring bank and Visa project application ID. Contact [email protected] to have an application registered to Visa for sandbox and production for your applications.
Required tenant configuration:
- For full set of required tenant configs refer to VAC/KiC Tenant Setup
- fees.amount.config.Pay.GLOBAL_TOG_VAC.CARD.SERVER=0.1P | Fees amount
- fees.wallet.config.Pay.GLOBAL_TOG_VAC.CARD.SERVER={WalletID} | Wallet ID to credit for fees
- source.wallet.config.GLOBAL_TOG_VAC.CARD.SERVER={WalletID} | Wallet ID to debit when a customer receives funds
Enabling mPOS
Step 1: Create a Terminal Type
For each tenant a kernel profile must be registered with Visa and made available as a terminal type to the tenant in order for terminals to be created and assigned to organisations. This is a backoffice task. The following screenshot show a terminal mapping created and mapped to tenant id: 7719:
 ** Attribute allowMultipleInstance will allow for multiple Terminal Instances to be created using this Terminal Type
NoteTypically a single, default terminal type is created and used in a tenant for all instances. However different terminal types can be created with custom settings for accepted cards, floor limits, refunds, etc. and then applied to specific users and wallets.
Only 1 device can be registered at a time per Terminal
Step 2: Create a New Store against the Organisation
A store in VAC terms represents a shop or store. Typically when implementing in a Eclipse 1 store is created per organisation.
Below is an example request:
POST /eclipse-conductor/rest/v1/tenants/{tenantId}/organisations/{organisationId}/stores

{
  "name": "R&P VAC Store",
  "city": "Cape Town",
  "country": "South Africa",
  "line1": "54 Forest Street",
  "state": "Western Cape"
}
Below is an example response:
{
    "storeId": 9,
    "name": "R&G VAC Store",
    "created": "2023-06-20T10:49:21.000Z",
    "lastModified": "2023-06-20T10:49:21.000Z",
    "city": "Cape Town",
    "state": "Western Cape",
    "line1": "54 Forest Street",
    "country": "South Africa",
    "version": 0,
    "mappings": [
        {
            "identifierType": "VAC",
            "identifier": "877fda01-7bf3-9ad9-188b-12f24535bb01"
        }
    ]
}
Step 3: Add a New Terminal against the Organisation
A terminal in VAC terms represents an actual device to accept payments. In most implementations a single terminal type is created for the tenant, and a single terminal is created per organisation. However if multiple terminal types exist then multiple terminals can be created on an organisation. These terminals can use different terminal types and can be configured to be locked to a particular user or wallet e.g. you only want a particular user to be able to use the terminal that can process refunds.
Below is an example request to create a terminal:
POST /eclipse-conductor/rest/v1/tenants/{tenantId}/organisations/{organisationId}/terminals

{
  "name": "R&P VAC Terminal",
  "storeId": "{{storeId}}",
  "terminalTypeId": "{{terminalTypeId}}",
  "status": "ACTIVE"
}
Below is an example response:
{
    "terminalId": 10,
    "terminalTypeId": 9,
    "storeId": 9,
    "name": "R&P VAC Terminal",
    "status": "ACTIVE",
    "created": "2023-06-20T10:50:41.000Z",
    "lastModified": "2023-06-20T10:50:41.000Z",
    "configuration": [],
    "version": 0,
    "mappings": []
}
Once the above is complete, VAC integrations will be initiated as per the Visa requirements.
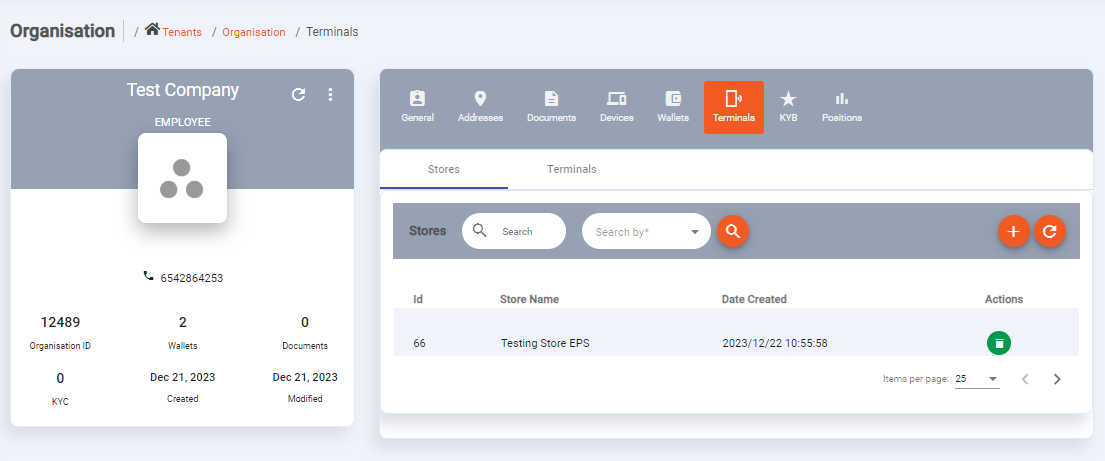
NoteStores and terminals can be viewed, added and deleted in the admin portal in the Terminals tab under an Organisation:
Step 4: Link calling user to organisation
The user completing the API calls in the subsequent steps needs to be a member of the organisation against which the store and terminals have been added.
Typically the API calls are done as the customer, and the customer is added as a member of the organisation. However tenants using a tenant system user to access Eclipse on behalf of customers would need to add a User with LEVEL_10 permissions and link that user as a member of all the organisations for which Tap On Phone payments will be initiated. This LEVEL_10 user should be used for all Tap On Phone payments.
Below is an example request to add a user to an organisation using APIs:
POST /eclipse-conductor/rest/v1/tenants/{tenantId}/customers/{customerId}/positions

{
  "position": "MEMBER",
  "organisationId": 12583
}
Below is an example response:
{
"organisationId": 12583,
"position": "MEMBER"
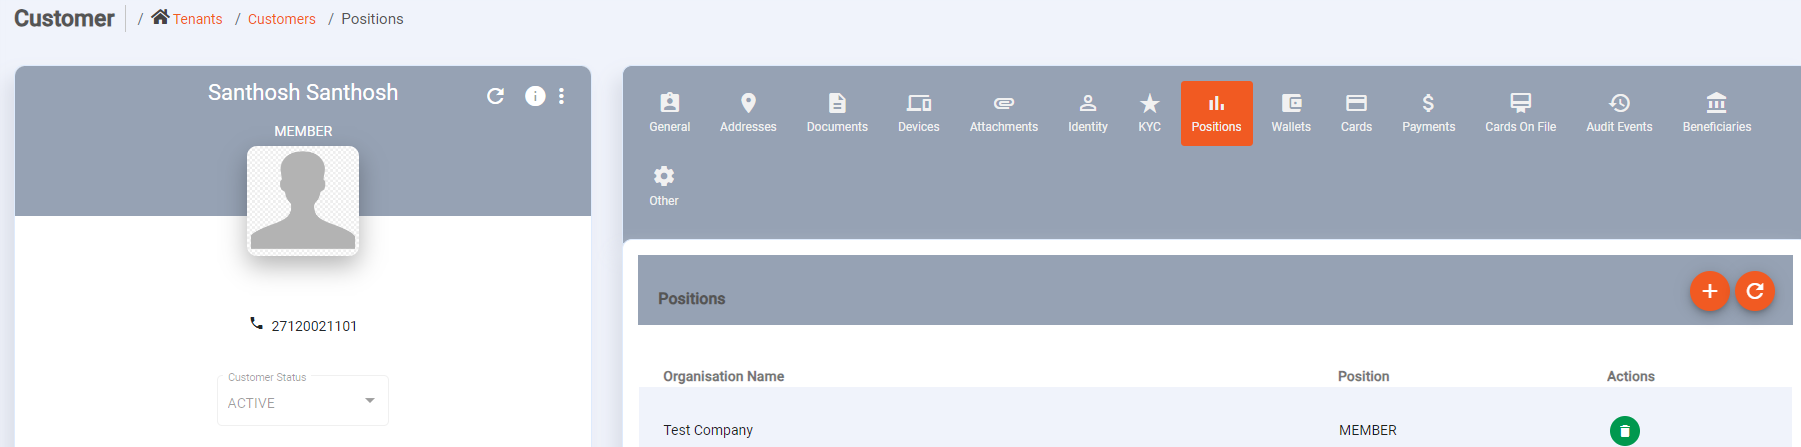
}User can be added to an Organisation using the Admin Portal by navigating to the customer then positions:
Step 5: Initiate Tap on Phone Payment
The below are prerequisites:
- Tracing must be implemented. If this is not done, debugging functionality will be disabled
- Check the version of the application to force upgrades
- CheckVacEligibility. This will check if this device can run VAC
Below is an example request for initiating a payment:
POST /eclipse-conductor/rest/v1/tenants/{tenantId}/payments

{
  "destinationWalletId": "{{walletId}}",
  "type": "GLOBAL_TOG",
  "amount": 510,
  "currency": "ZAR",
  "externalUniqueId": "{{$guid}}"
}
Below is an example response for initiating a payment:
"paymentId": 54202,
    "externalUniqueId": "42ef7499-f42a-47a8-a8f1-6393d1953bd3",
    "status": "PENDING",
    "amount": 510.000000000,
    "merchantName": "R&G VAC Test Org",
    "currency": "ZAR",
    "destinationWalletId": 247424",
    "acceptedCardSchemes": [],
    "acceptedPaymentMechanisms": [],
    "completionUrl": "eclipse://payment.service/tap?paymentId=54202&eclipseJwt="xxxx"",
    "paymentType": "CARD",
    "created": "2023-06-20T11:15:03.000Z",
    "paymentInstrumentInfo": {},
    "fee": 0,
    "walletId": 196955,
    "customerId": 1126
Step 6: Enroll the Device
If a device is NOT enrolled, the following must be done:
GET /eclipse-conductor/rest/v1/global/config/public.jwt.protected.visa.vac.sdk.setupInitiate the SDK with the data from the above request. This will return device certificates which must be used to create a terminal as per the below request:
POST: https://eclipse-java-sandbox.ukheshe.rocks/eclipse-conductor/rest/v1/tenants/{{tenantId}}/terminals/enrollments

{
    "deviceCerts": [
        "xxx",
        "xxx",
        "xxx",
        "xxx"
      ],
  "deviceInfo": {
        "osType": "Android",
        "model": "SM-G973F",
        "manufacturer": "samsung"
    }
}
Enrolled device example response. The response is data passed to the SDK to instruct it to enroll the new device.
{
    "deviceId": "a8fd57fd-52c1-f2c8-4e9e-1f12c0477101",
    "deviceAuthPubKid": "4e1708ac-c8e3-45b8-a9a9-f49f64ba0d50",
    "xviaHint": "xxx"
}
Note
- Enrolling a device must only be done per app install. Save the enrolled device details in a local storage to avoid re-enrolling.
- The call to enroll a device must be done from a user that is linked to the organisation against which the terminals have been added
Step 7: Invoke Visa SDK to initiate transaction
- Start up the SDK (refer to the Visa documentation) - this checks whether the SDK is satisfied with your phone
- Make a payment by calling startTransaction (refer to the Visa documentation)
- Update Eclipse on SUCCESS or FAILURE of payment
Step 8: Update Eclipse on SUCCESSFUL or UNSUCCESSFUL payment
Below is an example request:
PUT /eclipse-conductor/rest/v1/tog/payments/{paymentId}
{
  "cardName": "xxxx",
  "cardLast4": "xxxx",
  "authCode": "xxxx",
  "reference": "xxxx",
  "status": "SUCCESSFUL",
  "transactionDate": "2018-05-11T13:35:11Z"
}
Below is an example response:
{
    "paymentId": 54203,
    "amount": 510.000000000,
    "fee": 0E-9,
    "currency": "ZAR",
    "unattended": false,
    "uniqueId": "096f1ac7-7f55-4151-8ef1-62a9128c279f",
    "tenantId": 8,
    "status": "FINAL",
    "userId": 1126,
    "walletId": 196955,
    "paymentType": "CARD",
    "paymentSubType": "SERVER",
    "gatewayStatus": "SUCCESSFUL",
    "gateway": "GLOBAL_TOG_VAC",
    "preProcessingCallbackIds": [],
    "postProcessingCallbackIds": [],
    "postSuccessCallbackIds": [],
    "postReversalCallbackIds": [],
    "completionUrl": "eclipse://payment.service/tap?paymentId=54203&eclipseJwt=eyJraWQiOiIxIiwiYWxnIjoiUFMyNTYifQ.eyJzdWIiOiJoYWxvdHN0Iiwic3JjIjoiQXV0aC1QIiwiY2giOiIrc2tLTk5qV0hpIiwicm9sZXMiOiIiLCJzZXNzIjoiZTIyODdlZTAtODIyZC00MTkzLTgxMmMtYTE5Mjc2NDg0NDJhIiwiaXAiOiI1NC44Ni41MC4xMzkiLCJpc3MiOiJodHRwOi8vZWNsaXBzZS1qYXZhLXNhbmRib3gudWtoZXNoZS5yb2NrcyIsImxvY2FsZSI6ImVuLVVTIiwidWlkIjoxMTI2LCJwb3MiOlt7Im8iOjgwLCJkIjowLCJwIjoiRU1QTE9ZRUUifV0sImV4cCI6MTY4NzI2MzQ2OCwiaWF0IjoxNjg3MjYyNTY4LCJ0ZW5hbnQiOjh9.KzLKh2dzevM2siNtfY5oYWAUrU-g32-d08NrEYdi4wkNXVaOtMblrh60lGOoz_br195v_WwClGhGVNayTrls-IzJxdWAIWnmsi3mOI9yM4d6dQIoCWAgiQ-Yho2Sq59L6KT97Q1-eqd01HYxqPsyEyyPtD_iPadht5BHPO1hHpFQiTyqP2r5_fATjfILWLouQ-X09nLomQcq2fe0hydqKunINu9UC3mlbZHB0deERJbEYqJKSkX6l5q4a9qG-GtHz5S_c55yC-mDYztJF3IBVsRDZMe371jNu4PjKw29HNpMNPVE3uOO4WPJRAd0xuwo-eiTlkMLCgPVyVL3Uu0PUw",
    "created": "2023-06-20T12:02:55.000Z",
    "lastPolled": "2018-05-11T13:35:11.000Z",
    "authCode": "1234",
    "createCardOnFile": false,
    "useCardOnFileIfAvailable": false,
    "additionalFields": [
        {
            "id": "merchantWalletId",
            "value": "196955"
        }
    ],
    "paymentReference": "xxxx",
    "cardLast4": "xxxx",
    "cardName": "xxxx",
    "merchantName": "R&G VAC Test Org",
    "acceptedCardSchemes": [],
    "acceptedPaymentMechanisms": [],
    "customFraudChecks": false
}