
Getting Started with AI Development
One prompt to load your AI tool with Eclipse skills and API context, plus a progression of test prompts to confirm everything is working.
Get your AI tool connected to Eclipse in two steps, then run a few prompts to confirm everything is working before you start building.
Prerequisites: sandbox credentials from the Eclipse onboarding team. See Sandbox Environment if you don't have these yet.
Step 1 — Connect the Eclipse MCP Server
The MCP server gives your AI tool live access to Eclipse API documentation and platform context. Follow the one-time setup for your tool here: MCP Setup →
Step 2 — Load the Eclipse Skills
Paste this prompt into your AI tool at the start of any Eclipse development session. Fill in your sandbox credentials before sending.
Before we start, fetch each URL below and save it as a named skill file in the project's AI assistant commands directory, formatted as markdown, so it is persistent and reusable across sessions without re-fetching:
- Authentication: https://developer.eftcorp.com/docs/aiauthentication
- Customer Management: https://developer.eftcorp.com/docs/customer-management
- Wallet Management: https://developer.eftcorp.com/docs/wallet-management
- Card Management: https://developer.eftcorp.com/docs/card-management
- KYC & Compliance: https://developer.eftcorp.com/docs/kyc-compliance
- Payment & Withdrawal: https://developer.eftcorp.com/docs/payment-withdrawal-management
- OpenAPI usage guide: https://developer.eftcorp.com/docs/openapi
- Admin Portal Portlets: https://developer.eftcorp.com/docs/portlets

Also load this API Reference:
https://eclipse-java-sandbox.ukheshe.rocks/openapi

If you are not able to persist skills in this tool please fetch and summarize the documents and keep them in the current conversation context for reference.

My Eclipse sandbox details:
- Base URL: https://eclipse-java-sandbox.ukheshe.rocks/eclipse-conductor/
- Tenant ID: {tenantId}
- Login: {identity}
- Password: {password}

Confirm when you have loaded everything and are ready to help me build on Eclipse.
Credential SecurityUse sandbox credentials only. This prompt is for development and testing — never substitute production credentials. Treat your sandbox password as a throwaway value and rotate it if you have shared it in any AI session.
Do not paste real passwords into AI prompts. Most AI tools retain conversation history and may use message content for model improvement. Credentials submitted in a prompt are no longer confidential.
Best practices for credentials with AI tools:
- Use short-lived JWTs instead of username/password wherever the AI tool supports it
- Store credentials in environment variables or a secrets manager — never hard-code them in prompts or committed files
- Revoke and rotate any credential shared in a prompt session as soon as the session ends
Test 1 — Basic: Check what's on my tenant
A simple question to confirm the MCP server is connected and returning live data.
What wallet types are available on my tenant? For each one, tell me the name,
currency, and whether it supports card issuance.
You should get a list drawn from your live tenant configuration. If the AI makes something up or says it can't access that information, check your MCP connection.
Test 2 — Intermediate: Look something up in the API
Confirms the OpenAPI spec is loaded and the AI is reading real field definitions rather than guessing.
I want to create a new customer via the API. What fields do I need to include in
the request body? Which ones are required, and what format does the phone number
have to be in?
The response should include the exact field names from the spec (firstName, lastName, phone1, nationalIdentityNumber, etc.) and the phone format rule (digits only, no + prefix). Any invented field names mean the spec isn't loaded.
Test 3 — Advanced: Build something real
Confirms the AI is generating code that will actually work against the Eclipse APIs.
Build me a standalone HTML page — single file, no build step required — that lets
me log in to my Eclipse sandbox and then shows a live list of all customers on my
tenant with their wallet balances.

Design requirements: this should look like it came out of Lovable or Linear —
premium SaaS quality. Use Inter or a similar clean sans-serif, a dark navy header,
card-based layout with subtle shadows, status badges with colour coding, and smooth
hover states throughout. No Bootstrap, no basic tables — think modern fintech dashboard.
Open the file in a browser, enter your sandbox credentials, and you should see your real customer data. This is the full loop working: MCP context + OpenAPI field names + Authentication skill + live API calls.
Go Further — Full Customer Onboarding Application
Once the tests pass, use this prompt to generate a complete onboarding application.
Using the Eclipse skills and OpenAPI spec you've already loaded, build a complete
standalone customer onboarding application as a single HTML file.

The application should have three sections:

1. LOGIN SCREEN
   Fields for base URL, tenant ID, identity and password.
   Authenticates with Eclipse and stores the JWT for subsequent calls.

2. CUSTOMER DASHBOARD
   A card-based grid showing all customers on the tenant.
   Each card shows the customer's name, phone, email, status, and total wallet balance.
   An "Add Customer" button opens the onboarding wizard.

3. ONBOARDING WIZARD — 4 steps with a progress bar
   Step 1: Customer details — first name, last name, phone (digits only, no +),
           email, national identity number
   Step 2: Documents — selfie photo and identity document, uploaded to Eclipse
   Step 3: KYC — automatically run identity verification when the user reaches
           this step. Show a spinner while it's in progress. If it passes, show
           a clear green success state and let the user continue. If it fails,
           show which specific checks didn't pass and block progression — the
           user cannot proceed to wallet setup until KYC is approved.
   Step 4: Wallet — show all wallet types available on the tenant as selectable
           cards. Types the customer is not eligible for are displayed but greyed
           out with a "not available" label so the user understands their options.
           The user picks an eligible type and confirms. The app creates the
           wallet and shows a success screen with the new wallet details.

Design requirements — this must look like a premium fintech product, not a tutorial:
- Inter font, dark navy (#050C43) header bar with a subtle logo mark
- Full-height sidebar layout with smooth section transitions
- Customer cards with soft shadows, avatar initials, and colour-coded status pills
- Wizard progress bar with animated step indicators and smooth slide transitions
  between steps
- Inputs with floating labels or clean labelled fields, focus rings in blue (#007AFF)
- All buttons have hover lift animations; destructive actions require a confirmation
- Skeleton loading placeholders while API calls are in flight
- Error messages surface the Eclipse traceId in a styled alert banner, not an alert()
- The overall aesthetic should match what you'd expect from Lovable, Linear, or Stripe —
  clean whitespace, precise typography, intentional colour use
All API calls go directly from the browser using the JWT. No frameworks, no build step.
Expected: a single .html file ready to open in a browser. Point it at your sandbox and it will create real customer records.
Go Further — Customer Card Management Application
Use this prompt to generate a complete customer self-service application — self-service ZA KYC onboarding, wallets, cards, transactions, PnP and Cash Express cash in/out, and profile management in a single file.
Using the Eclipse skills and OpenAPI spec you've already loaded, build a complete
standalone customer card management application as a single HTML file.

The application has two journeys: self-service registration for new customers,
and the full self-service dashboard for existing customers.

JOURNEY 1: SELF-SERVICE REGISTRATION

Use the Customer Management skill (ONBOARDING pattern) for this journey.
Add a "New? Register here" link on the login screen.

The app requires a pair of ONBOARDING admin credentials stored as constants:
  const ONBOARDING_IDENTITY = '{onboardingIdentity}';
  const ONBOARDING_PASSWORD = '{onboardingPassword}';

Registration wizard — 5 steps with a progress bar:

  Step 1 — Phone number
  Check for an existing customer with that phone. If found, redirect to login.
  If not, create the customer record using the ONBOARDING JWT.
  Send an OTP to verify phone ownership before proceeding.

  Step 2 — Create login credentials
  Customer chooses a username and password.
  Create the identity using the ONBOARDING JWT.
  Immediately log in as the customer, obtain the customer JWT, and discard
  the ONBOARDING JWT — it must not be used again.

  Step 3 — Personal details
  First name, last name, email, date of birth, South African national
  identity number (13 digits — validate format client-side).
  Update the customer profile with the customer JWT.

  Step 4 — Identity verification
  Use the KYC & Compliance skill (AWS Liveness — Eclipse Hosted Flow).
  Open the Eclipse-managed liveness web view in an iFrame.
  On completion redirect, retrieve the liveness result.
  If liveness fails, offer a retry — do not proceed to step 5.

  Step 5 — KYC result and account activation
  Trigger KYC ratification and poll until no longer PENDING.
  PASSED: check wallet eligibility, provision a card-enabled wallet, then
  provision a virtual card using the Card Management skill. Show the new
  wallet balance and masked card details. Offer "Go to my account".
  FAILED: show which checks failed in plain English. Block progression.

JOURNEY 2: EXISTING CUSTOMER SELF-SERVICE

1. LOGIN SCREEN
   Base URL, tenant ID, identity, password. JWT stored for all calls.
   "New? Register here" link opens Journey 1.

2. CUSTOMER DASHBOARD
   Profile summary: name, status, contact details, KYC status.
   Financial overview: total balance, wallet count, active/blocked card counts,
   recent activity feed. Navigation to all sections below.

3. WALLETS
   All wallets with name, status, balances, and currency.
   Wallet detail: transaction history with search and date/type/amount filtering.

4. CARDS
   All cards: masked PAN, type, status, expiry, linked wallet.
   Card detail: lifecycle actions where supported (freeze, unfreeze, block, replace).

5. CARD MANAGEMENT
   Lifecycle operations based strictly on API capabilities.
   Destructive actions require confirmation and reflect the API response immediately.

6. CARD PIN MANAGEMENT
   Set, change, and reset PIN if supported. Masked inputs with confirmation step.

7. TRANSACTIONS
   Unified view across wallets and cards with search, filtering, and pagination.

8. CASH IN — Pick n Pay / Boxer
   Use the Payment & Withdrawal skill (Pick n Pay / Boxer Cash In section).
   Customer selects wallet and amount. Display the returned cash-in token
   prominently with teller instructions and expiry. Poll until settled.

9. CASH OUT
   Two selectable options:
   a. Pick n Pay / Boxer — use the Payment & Withdrawal skill (PnP Cash Out section).
      Display the withdrawal token with teller instructions, fee, and expiry.
   b. Cash Express ATM (Paycorp) — use the Payment & Withdrawal skill (ATM section).
      Display the withdrawal token with step-by-step ATM instructions.
      Also show nearby ATM locations fetched from the global config.

10. PROFILE
    View and update customer details. Show KYC and account status.

11. SETTINGS
    Logout, theme toggle (light/dark), session management.

GLOBAL BEHAVIOUR:
- Journey 1 steps 1–2 use the ONBOARDING JWT. Discard it after step 2 and use
  the customer JWT for everything else.
- All endpoints come from the OpenAPI spec and loaded skills — do not invent any.
- Hide unsupported features rather than showing errors.
- Surface traceId in all error states inside a styled banner — never alert().

DESIGN REQUIREMENTS — premium fintech product:
- Inter font, dark navy shell (#050C43)
- Full-screen wizard for Journey 1; full-height sidebar for Journey 2
- Card-based UI, soft shadows, skeleton loaders, toast notifications
- Slide-over drawers for detail views, smooth transitions, hover lift animations
- Inline validation on all fields, desktop-first responsive layout
- Aesthetic: Stripe, Wise, Revolut, Mercury, or Linear

TECHNICAL REQUIREMENTS:
- Single self-contained HTML file, vanilla HTML/CSS/JS, no frameworks
- Centralised async/await API client with automatic JWT injection
- OpenAPI spec is the source of truth for all endpoints
Expected: a single .html file ready to open in a browser. New customers can register and complete ZA KYC entirely within the app; existing customers have full wallet, card, cash in/out, and profile management against live sandbox data.
Advanced: Build an Admin Portal Portlet
A portlet is a self-contained HTML page that appears as a native section in the Eclipse Admin Portal navigation. The portal handles authentication automatically — when a portal user opens a portlet, a signed JWT is injected via a ?token= URL parameter.
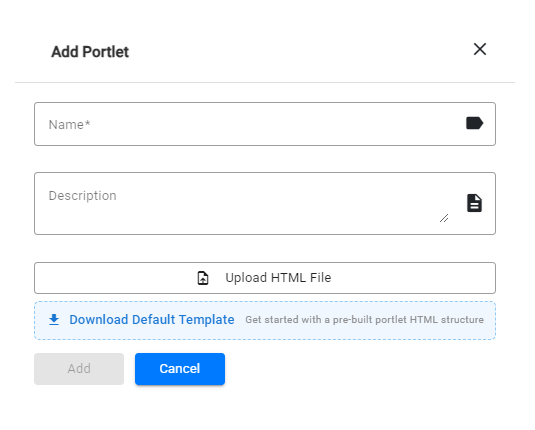
Get the official template first. In the Admin Portal, select your tenant, then go to Portlets → Create New. The dialog has a Download Default Template button — this gives you the exact HTML starting point with the correct design system, auth infrastructure, and Tailwind config already wired in.
Give the template to your AI tool and use this prompt to build from it:
I've attached the Eclipse portlet template. Using the Admin Portal Portlets skill you've
already loaded, extend this template into a complete portlet that displays a searchable,
paginated list of wallets on my tenant.

Include:
- 4 stat cards at the top (total wallets, active count, total balance, suspended count)
- Search input and filter chips in the table header
- Row-level action buttons to view wallet detail and copy the wallet ID
- Skeleton loading rows while fetching, and an empty state if the list is empty

tenantId: {tenantId}
Once the AI returns the modified file, register it back in the portal: Portlets → Create New, upload the HTML file, give it a name and description, and save. It appears in the navigation immediately.
To build any portlet from scratch, describe your use case:
Using the Admin Portal Portlets skill, build an Eclipse portlet for [describe your use case].
Primary data entity: [wallet / customer / payment / card]
tenantId: {tenantId}
NoteAlways start from the downloaded template rather than asking the AI to generate the full file from scratch — the template contains the complete auth block and design tokens that every portlet requires. Do not ask the AI to modify the auth block or CDN imports.
Advanced: Build a Plugin
Plugins extend Eclipse at runtime without rebuilding or redeploying any service. You write a JAR, upload it through the Plugin API, and Eclipse hot-reloads it within 10 seconds. Plugins can listen on platform events (wallet transfers, payments, user creation), replace built-in components (wallet types, payment gateways), run scheduled batch jobs, or supply services such as FX rates and SMS delivery.
The plugin developer guide is not loaded in Step 2 by default — load it first:
Fetch and save this document as a named skill in the project's AI assistant commands
directory, formatted as markdown:
- Eclipse Plugin Developer Guide: https://developer.eftcorp.com/docs/developing-eclipse-plugins

Confirm when loaded and summarise what plugin types are available.
Once loaded, use this prompt to build your first plugin:
Using the Eclipse Plugin Developer Guide skill, create a complete Java Maven plugin project
that listens on the wallet.postWalletTransfer injection point and logs a summary of each
completed transfer.

Requirements:
- @PluginDescriptor name: "transfer-logger"
- @Singleton handler class with the @OnNamedInjectionPoint method, receiving
  @Named("from") IWallet, @Named("to") IWallet, and @Named("history") List<WalletHistory>
- Full pom.xml: parent com.ukheshe:eclipse, packaging jar, Java 25
- Do not bundle any com.ukheshe.* classes — they are provided by the platform

Also provide the curl commands to build the JAR and deploy it to sandbox as a global plugin.
Build with mvn package -DskipTests, then deploy using the curl commands the AI provides. The plugin goes live within 10 seconds.
NotePlugin code runs in a restricted class loader. Reflection, file I/O, sockets, threads, and
System/Runtimeare blocked by the sandbox. Use the injectedEntityManager,RequestContext, and REST clients instead — the guide covers exactly what is available for injection.
Something Not Working?
If the generated code doesn't behave as expected, just tell the AI what went wrong and ask it to fix it.
For example:
- "The login isn't working — I'm getting a 401 error. Fix it."
- "The customer list isn't loading. The console shows a CORS error."
- "The wallet balance is showing as undefined. Fix the display."
- "Step 3 of the wizard isn't progressing after KYC passes. Debug and fix."
Next Steps
| Topic | Where to go |
|---|---|
| Full skills reference | Skills Library → |
| Authentication options (PKI, TOTP) | Authentication Skill → |
| Card issuance | Card Management Skill → |
| Payments and withdrawals | Payment & Withdrawal Skill → |
| OpenAPI spec reference | Eclipse OpenAPI Spec → |
Updated 29 days ago